Installing
PowerCoach Software
• This document and the treated topics refer to build 20011020 of PowerCoach Developer Version 00.08.11.
• You must read completely and carefully all the terms and conditions of the PowerCoach Software License Agreement.
• Köchli Sport AG is willing to license the software to you only on the condition that you accept all the terms contained in the license agreement.
• The conception, structure
and organization of PowerCoach software are the intellectual property of
Köchli Sport AG and protected as such by copyright law.
Installing PowerCoach Software on Windows
Installing PowerCoach Software on Mac OS
About Quality Control, known Problems and Bugs
Message
Windows
Out
of Memory
Endless
Alert Loop
Known
Bugs on Windows
Installing PowerCoach
Developer Software on Windows
• Copy the complete software package for Windows from the PowerCoach CD to a hard disk volume of your computer:
1. Insert the PowerCoach CD in the computer.
2. On the CD "POWERCOACH_000811" you see a folder named "WINDOWS".
3. In this folder named "WINDOWS" is another folder named "POWCOACH".
4. Copy the folder named "POWCOACH" from the CD to any hard disk volume on the computer.
5. Once on the hard disk volume, rename this copied folder "PowerCoach".
6. On the CD "POWERCOACH_000811" you see a folder named "DATA". Copy this folder named "DATA" from the CD to the folder "PowerCoach" on the hard disk.
7. On the CD "POWERCOACH_000811" you see a folder named "PCO_DOC". Copy this folder named "PCO_DOC" from the CD to the folder "PowerCoach" on the hard disk.
8. Remove the CD "POWERCOACH_000811"
from the computer.
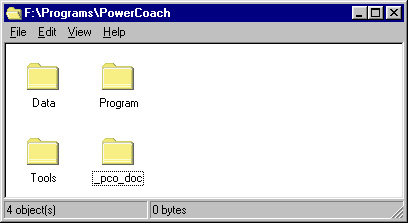
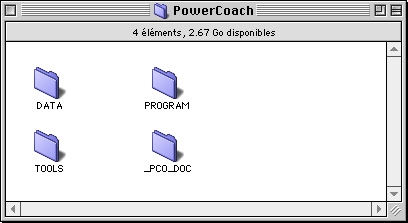
• In the "PowerCoach" folder on the hard disk volume you should now see 4 folders:
- "DATA"
- "PROGRAM"
- "TOOLS"
- "PCO_DOC"
• Uncheck the file attribute "Read-only" of all files contained in the folders "DATA" and "PROGRAM".
NOTE:
On Windows, files copied from a CD have checked the file attribute "Read-only".
PowerCoach cannot be used, if a file contained in the folders "DATA" or
"PROGRAM" is write protected.
At first, make sure that all files are visible in the respective folders.
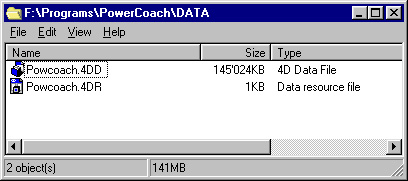
NOTE: If all files contained in folder "DATA" are visible, you should see at least the following 2 files:
- POWCOACH.4DD
- POWCOACH.4DR
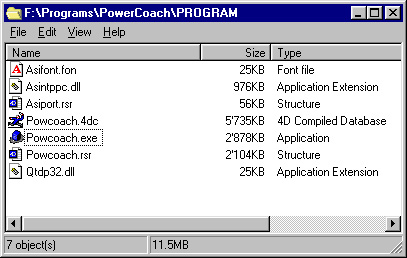
If all files contained in folder "PROGRAM" are visible, you should see at least the following 7 files:
- ASIFONT.FON
- ASINTPPC.DLL
- ASIPORT.RSR
- POWCOACH.4DC
- POWCOACH.EXE
- POWCOACH.RSR
- QTDP32.DLL
If not all files are visible in a folder, proceed as follows:
1. On the open folder window, pull down the menu "View" and select the command "Options...".
2. On the dialog window "Options", go to the dialog page "View".
3. On the page "View", select for "Hidden files" the option "Show all files".
4. On the page "View", uncheck the option "Hide file extensions for known file types".
5. If your version of Windows offers the option, apply the new view setting to all folders.
6. Click the button
"Apply" to confirm the new setting.
Once that all files are visible, uncheck the attribute "Read-only" of each file:
1. Right-click files and select the menu command "Properties".
2. On the dialog window "X Properties", uncheck the file attribute "Read-only".
3. Click the button "Apply" to confirm the new file attribute.
Repeat this
for all files contained in the folders "DATA" and "PROGRAM".
• Make sure that the dot [.] is set as "Decimal symbol" on the dialog page "Number" of the "Control Panel" dialog window "Regional Settings Properties".
NOTE:
You get to the dialog window "Regional Settings Properties" if you click
on "Start", move to "Settings", select the menu command "Control Panel",
and then double click "Regional Settings".
• Make sure that the comma [,] is not set as "Digit grouping symbol" on the dialog page "Number" of the "Control Panel" dialog window "Regional Settings Properties".
We suggest to set the apostrophe
[']
as "Digit grouping symbol".
• Make sure that the scheme "Windows Standard" is selected (or a setting using the same dimensions as "Windows Standard") on the dialog page "Appearance" of the "Control Panel" dialog window "Display Properties".
NOTE:
You get to the dialog window "Display Properties" if you click on "Start",
move to "Settings", select the menu command "Control Panel", and then double
click "Display".
• Make sure that "Small Fonts" is selected as "Font Size" on the dialog page "Settings" of the "Control Panel" dialog window "Display Properties".
NOTE:
On some computers, the "Font Size" must be set on a separate dialog window
that opens after clicking the button "More options...".
• Make sure that the "Verdana" fonts are installed. Copy the files "Verdana.ttf", "VerdanaB.ttf", "VerdanaI.ttf" and "VerdanaZ.ttf" to the "Fonts" folder of the "Control Panel" window, if these files are not contained in the folder.
NOTE:
The "Verdana" fonts are located in the subfolder "FONTS" of the folder
"TOOLS". If you need to install these fonts, uncheck the attribute "Read-only"
of each font file.
• Start PowerCoach with double click on the file "POWCOACH.EXE".
NOTE:
The file "POWCOACH.EXE" is located in the folder "PROGRAM". You may create
a shortcut to this file and use the shortcut to launch PowerCoach.
• When starting up for the first time, PowerCoach is asking the user to open a PowerCoach_Data file.
Use the Open File dialog window to select and open the file "POWCOACH.4DD".
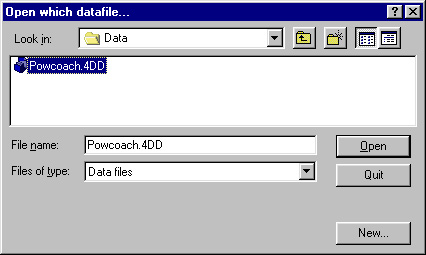
A file named "POWCOACH.4DD" is located in the folder "DATA". It is a data base file that contains many objects as examples (data series, Pictures and Picture Projects).
The folder "DATA" contains the folder "ORIGINAL". Another file named "POWCOACH.4DD" is located in this folder. It is an empty data base file that does not contain examples.
NOTE:
You must uncheck the attribute "Read-only" of the files "POWCOACH.4DD"
and "POWCOACH.4DR" (in the folders "DATA" or "ORIGINAL") before using the
respective data base file.
• Once that the PowerCoach startup window is displayed, you may choose the user language.
Click the invisible pop up chooser located on the software version indicator and select user language English, French or German.

• After that, click anywhere on
the startup screen or type [RET] to resume the startup process.
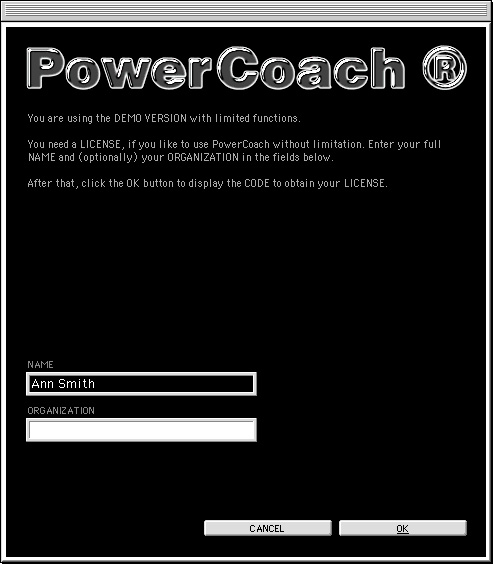
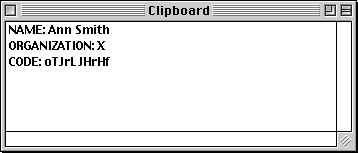
• When the licensing window gets displayed, you must enter your firstnames and your name into the first field.
Optionally, you may enter the name of your organization into the second field.
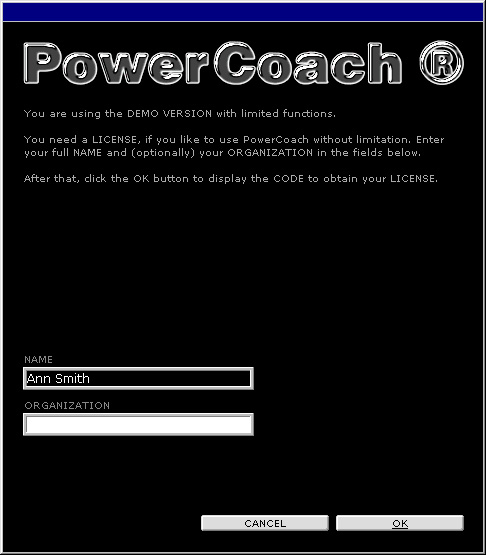
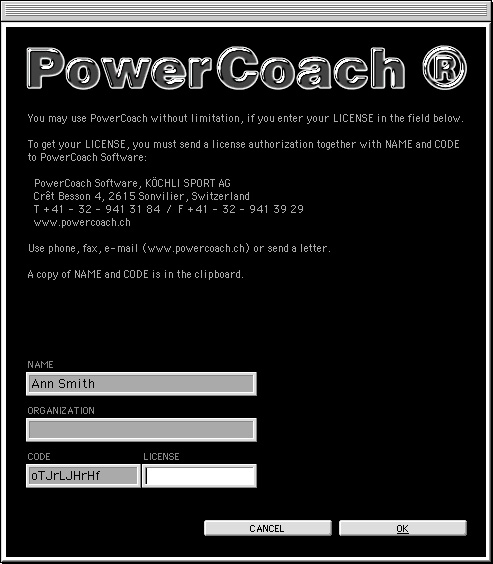
• Once you have entered your names, click the "OK" button to display the window with the code and the entry field for the license.
You must communicate your names together with the displayed code to PowerCoach Software to get your license.
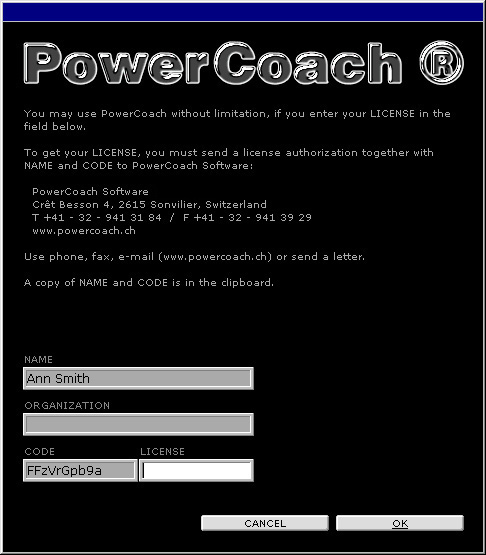
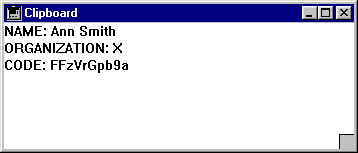
NOTE: PowerCoach sends a copy of the name, organization and code to the Clipboard when the window with the code and the entry field for the license gets displayed. From the Clipboard, you may directly paste these items to the notepad, a text document or e-mail.
• As long as PowerCoach is not licensed, the program displays at startup the window with the code and the entry field for the license.
. If you do not know your license yet or if you do not want a licensed program, click "CANCEL".
. Once you know your license,
enter the license into the respective field and click "OK".
Installing PowerCoach
Developer Software on Mac OS
• Copy the complete software package for Mac OS from the PowerCoach CD to a hard disk volume of your computer:
1. Insert the PowerCoach CD in the computer.
2. On the CD "POWERCOACH_000811" you see a folder named "MAC_OS".
3. In this folder named "MAC_OS" is another folder named "POWCOACH".
4. Copy the folder named "POWCOACH" from the CD to any hard disk volume on the computer.
5. Once on the hard disk volume, rename this copied folder "PowerCoach".
6. On the CD "POWERCOACH_000811" you see a folder named "DATA". Copy this folder named "DATA" from the CD to the folder "PowerCoach" on the hard disk.
7. On the CD "POWERCOACH_000811" you see a folder named "PCO_DOC". Copy this folder named "PCO_DOC" from the CD to the folder "PowerCoach" on the hard disk.
8. Remove the CD "POWERCOACH_000811"
from the computer.
• In the "PowerCoach" folder on the hard disk volume you should now see 4 folders:
- "DATA"
- "PROGRAM"
- "TOOLS"
- "PCO_DOC"
• Start PowerCoach with double click on the file "POWCOACH".
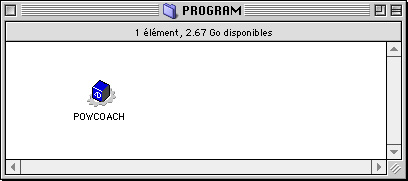
NOTE:
The file "POWCOACH" is located in the folder "PROGRAM". You may create
an alias of this file and use the alias to launch PowerCoach.
• When starting up for the first time, PowerCoach is asking the user to open a PowerCoach_Data file.
Use the Open File dialog window to select and open the file "POWCOACH.4DD".
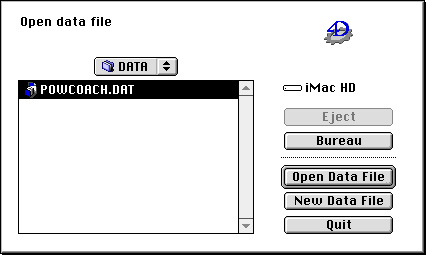
A file named "POWCOACH.4DD" is located in the folder "DATA". It is a data base file that contains many objects as examples (data series, Pictures and Picture Projects).
The folder "DATA" contains the folder "ORIGINAL". Another file named "POWCOACH.4DD" is located in this folder. It is an empty data base file that does not contain examples.
NOTE:
In the folders "DATA" and "ORIGINAL" you may see another file named "POWCOACH.4DR".
This file is an empty resource file, used only on Windows computers. You
can trash the file "POWCOACH.4DR" on Mac OS computers.
• Once that the PowerCoach startup window is displayed, you may choose the user language.
Click the invisible pop up chooser located on the software version indicator and select user language English, French or German.

• After that, click anywhere on
the startup screen or type [RET] to resume the startup process.
• When the licensing window gets displayed, you must enter your firstnames and your name into the first field.
Optionally, you may enter the name of your organization into the second field.
• Once you have entered your names, click the "OK" button to display the window with the code and the entry field for the license.
You must communicate your names together with the displayed code to PowerCoach Software to get your license.
NOTE: PowerCoach sends a copy of the name, organization and code to the Clipboard when the window with the code and the entry field for the license gets displayed. From the Clipboard, you may directly paste these items to the notepad, a text document or e-mail.
• As long as PowerCoach is not licensed, the program displays at startup the window with the code and the entry field for the license.
. If you do not know your license yet or if you do not want a licensed program, click "CANCEL".
. Once you know your license,
enter the license into the respective field and click "OK".
About Quality Control,
known Problems and Bugs
• The program may display message windows of the internal quality control. These messages contain information about an unexpected or undesirable status of the program. The windows show typically alerts like this:
- "XXX happened in method YYY."
- "Unexpected action XXX in process YYY at line ZZZ."
If such type of alerts get displayed, something happened that was not expected to happen.
Please keep a Picture of the message
window and try to describe the action that caused the alert.
NOTE: You may send an image copy of the message window to the Clipboard.
. To send an image to the Clipboard on WIN, use Keyboard Command [ALT] + [Print Screen].
. To send an image to the Clipboard on MAC, execute Keyboard Command [LOC] [CTR] [SHI] + [4] and then control click [ctrl] + [*] the window.
Once in the
Clipboard, you may easily add
an image as Picture to the Album and attach a note.
• The message "Out of memory - Quit the application as soon as possible" is a serious alert.
To make sure
that the data base file will not get damaged,
you should immediately force quit the program.
NOTE: Execute the system command of the respective computer platform to force quit the program.
. On WIN, execute [CTR] [ALT] + [Delete] and quit PowerCoach using the Task Manager.
. On
MAC, execute [ctrl] [ALT] [CTR] + [ESC] and quit PowerCoach.
• You will loose work that
has not been saved. The data base file will not get damaged. If you keep
going (clicking the "OK" button of the alert window), you might run into
a problem with PowerCoach_Data
that needs repair with 4DTOOLS.
• Out of memory conditions
may arise (especially on Mac OS) with minimum memory configurations if
many Jobs are active and while large image objects are processed simultaneously
in many Jobs (for example, when sending 3D
Graph Picture series to the Album).
• An endless alert loop leads to a "no issue" situation, if values greater than 60 are entered for minutes or seconds into the field "Start time" on the "Data Series" Job Window page 1 ("Parameters + Data").
You must force quit the program and
you will therefore loose unsaved data.
NOTE: Execute the system command of the respective computer platform to force quit the program.
. On WIN, execute [CTR] [ALT] + [Delete] and quit PowerCoach using the Task Manager.
. On
MAC, execute [ctrl] [ALT] [CTR] + [ESC] and quit PowerCoach.
• On Windows computer platform,
initialization is slow and displays each window page, if Jobs with
multi page Job Windows (for example "Data Series" Jobs) are launched while
in maximized windows mode.
• On Windows computer platform,
Graph Windows generate unpredictable results, if a displayed Graph
Title enforces a horizontal Graph Window width that is larger than the
application window.
Copyright by PowerCoach® Software - 20011020